
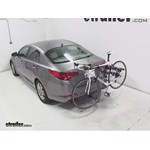
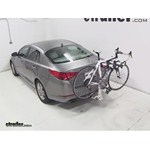
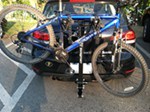
# 1
Thule Passage Trunk Bike Rack for 2 Bikes - Hanging Style
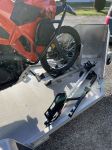
Ordered online, it shipped the same day. Received it 3 days later. There is a little assembly, but, pretty simple. It took me less than 15 minutes to install and no tools were needed. It is adjustable to be used on many different auto types, but, the instructions were very clear about how to adjust it to fit my 2011 Ford Edge. I have used it twice so far to transport my bike. There are a couple of items that are inherent in the design, not a flaw, but, you need to be aware of them. First, you can't use rear window wipers. Second, the back-up alarm goes nuts because it registers a bike less than 6 inches behind you (I tolerate it for the few seconds it takes to back out of my driveway or out of a parking lot). Third, there is a little flexibility, it is held on with straps and clamps, not bolts, so, it bounces a little when you go over bumps or make sharp turns, however, it holds the bike fast to the frame and stays on the car. I use mine to transport my bike on short trips around town to bike trails. On a long trip I would suggest checking that the straps remain tight from time to time during the drive.
Positive: The product is well thought out and works for a wide range of automotive vehicles. It comes with interesting dampers that i think work. Instructions seem to be translated from another language, but are quite good, accompanying pictures make installation straightforward. A test drive over speed bumps shows that the rack will support the bike for all travel needs. It can be disassembled , collapsed and stored in the trunk. Downside: The rack is made for the classic triangular shaped frame: horizontal cross bar, "male" bike. For bikes without the horizontal bar, mounting is a little less satisfactory. Such a bike can only be mounted on the outside mounts. Cannot use the damper on one side. Picture shows the mounting. as to a design solution, maybe brackets could be replaced with smaller profile, some adjustability? however, as it is, vibration control is good and adjustability with smaller profile would have vibration concerns.
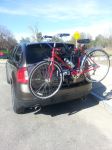
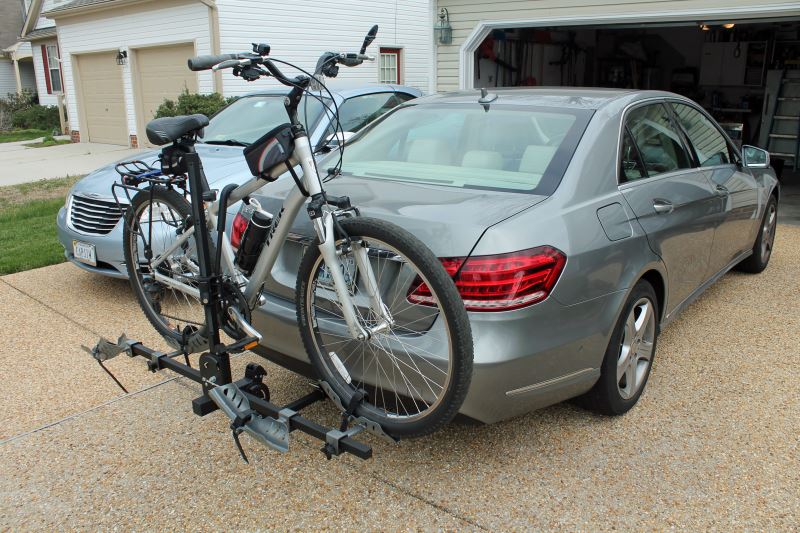
# 2
Swagman Chinook Bike Rack for 2 Bikes - 1-1/4" and 2" Hitches - Frame Mount
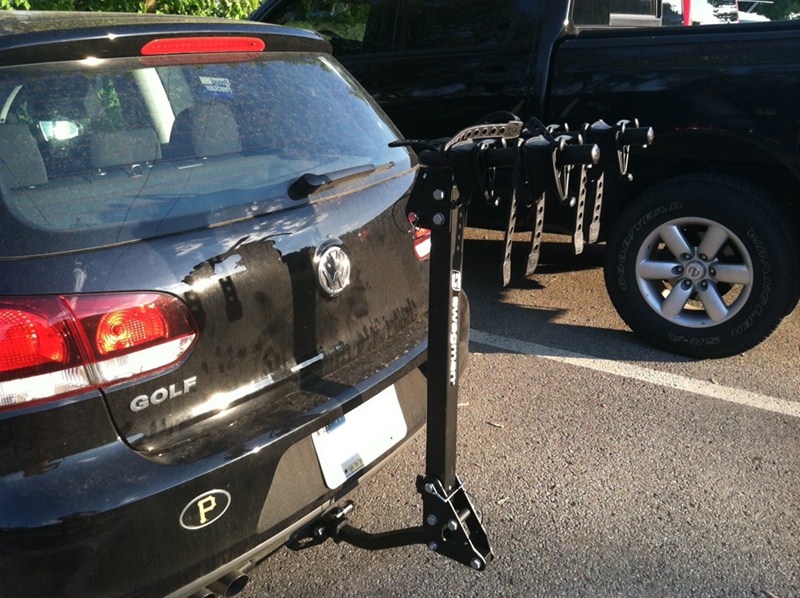
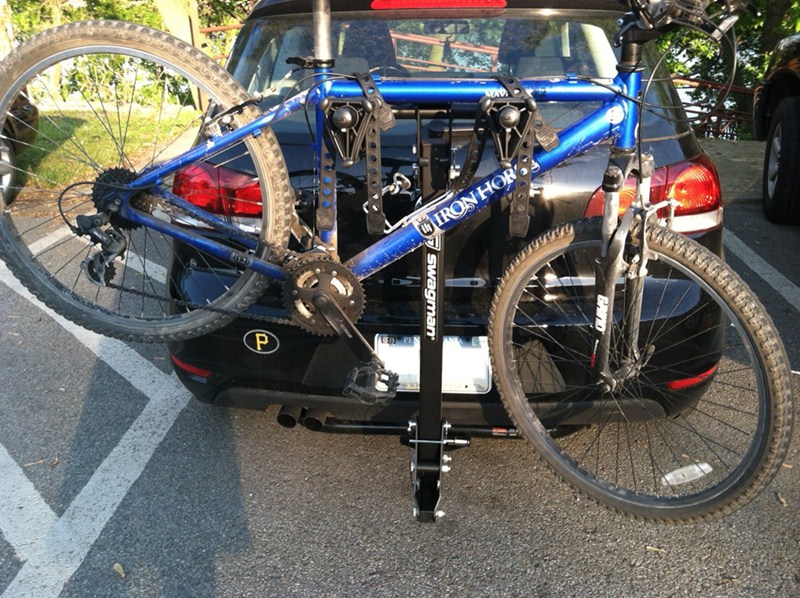
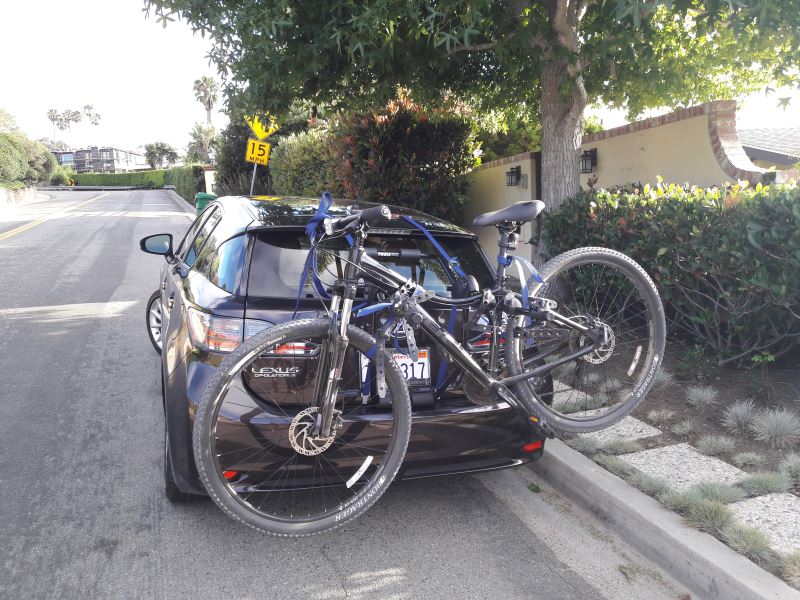
Truly grooving on my wife's new Swagman Chinook bike rack. She wanted to be able to transport her nice road bike easily without throwing it in the back of her car, and since a roof rack is out of the question, this Swagman model fit the bill perfectly. It arrived quickly on the anticipated date. Kudos to etrailer.com for the email updates to keep me informed of my purchase. Within one hour, it was installed on my wife's 2014 Mazda3 hatchback. The Swagman is heavy and solid, which is reassuring as it makes me feel confident that it will keep the bikes secure. It also makes me feel like I got my money's worth. A ratchet wrench and Phillip's head screwdriver were the only tools required for the easy install. I did my research before purchasing the Chinook model as I was also eyeballing a very similar Thule rack that was slightly more expensive. I spoke with an etrailer.com expert who gave me the lowdown on both models. Ultimately, the Swagman won out because it has a smaller 'footprint' while extended or folded up ... and also can tilt away from the car for easy access to the hatchback area. Very convenient! FYI: Mazda doesn't make a trailer hitch for the Mazda3 as it's a small car with a small engine and has no business towing anything. Thankfully, the Curt company makes an aftermarket frame and trailer hitch that fits the Mazda3 hatchback perfectly with no drilling. Stupidly, I purchased it from another online company thinking I was getting a good deal. Turns out etrailer.com had it for less with FREE shipping. Oh well ... live and learn. Now I know that etrailer.com is one-stop shopping for bike racks AND trailer hitches. (Full disclosure: I had the garage down the street install the frame as it's easier with a lift) Only snafu: the shipment contained an extra set of keys that I assumed was for the hitch bolt lock (there was also a set of keys on the bolt itself). I spent 15 minutes using those keys trying to figure out how to remove the lock from the bolt to install it on the hitch. The keys just wouldn't turn in the lock. I called etrailer.com and Kevin told me to try the other set of keys ... and they worked. So an extra set of keys came with it that did absolutely nothing ... weird! Obviously, I can't speak to the longevity and durability of the Swagman Chinook 2 Bike Platform Rack as I just installed it. What I can speak to is the sturdiness of it, the ease of the installation and my complete satisfaction with the good folks at etrailer.com.
I ordered the Swagman Chinook 2 Bike Platform Rack on line from etrailer and so far have been very satisfied. The bike rack was delivered in less than a week. Unpacking the rack and assembly was fairly straightforward. I have read some reviews that complained the assembly instructions were a bit vague. I didn't have a problem but can see where others without a mechanical background get confused. The rack is very sturdy, but there is some side to side play in the tilt mechanism. I'm not sure this can be avoided with a rack that folds down. Installing the Curt trunk stabilizing strap takes most of the sway out of the rack. Installation is fairly easy and quick. It takes me 6 - 7 minutes to install the back on my hitch, and to install the bike and be ready to drive away. That seems reasonable to me. So far I've only loaded 1 bike. I've included pictures of my installation on a 2014 Mercedes Benz E350 sedan. Clearance between the bikes, the rack and the car are good. With the bike loaded in the inside, most forward position, I have 6" clearance between the pedal and the bumper. With the bike removed, the center support folded flat and the rack folded up in the storage position, I have 4" clearance between the closest part of the bike rack (the fold down hinge assembly) and the back bumper of the car. I am able to open the trunk of the car without removing the bikes or using the tilt feature, but I do have to remove the stabilizing strap first. Overall, I'm very pleased with the bike rack and think it will serve me much better than my old strap on rack. Since the weather has been cool since getting the bike carrier, I haven't taken any long trips to give it a real workout.
# 3
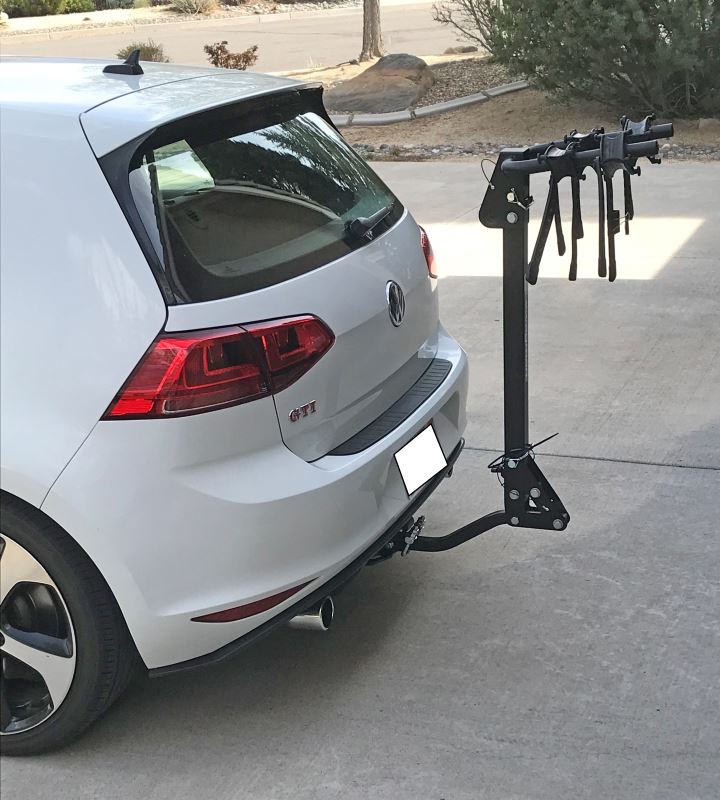
Swagman Trailhead Bike Rack for 2 Bikes - 1-1/4" and 2" Hitches - Tilting
etrailer has the best pre- and post-sales customer service I've ever seen! I started out not knowing anything about hitch-mounted racks. So I wrote to etrailer telling them about my car and type of hitch I was about to have installed. Samuel wrote back with lots of great information tailored specifically to my car. He even included a photo that looked just like my 2017 white VW GTI with a hitch and rack installed. Okay something of a coincidence. But the rest of the assistance I got from the crew at etrailer was just as prophetic. I went into this a novice and came out knowing lots more about hitches and racks and finding the rack best suited to my situation. I have a small car, a class 1 hitch and a heavy mountain bike. I got exactly what I needed. As to the Swagman rack itself, it works fine. If I had a different situation I would probably buy a platform rack as they are easier to load. There's no reason to buy a bike rack anywhere else.
First off, thanks to Jason T. or "Troop". The exemplary customer service he provided is rare these days. Troop made several calls to the various manufacturers to ascertain which bike rack would afford me the most ground clearance as my new VW Golf sits low to the ground and my old bike rack frequently scraped the ground when I went up even a slight up hill grade. His efforts paid off as he found me the best bike rack for my car, the Swagman Trailhead 2 Bike Carrier. It sits up off the ground just high enough that it doesn't scrape on my driveway. It is also sturdy and holds my bikes securely. And, the delivery was amazingly fast. I had my rack in about 2 days! Note to Troop, see my Pittsburgh Pirates Logo on my bumper in the attached pictures? Pirate Fans persevere! The Bucco's will be coming after your Cardinals this year! Thanks again Troop!
# 4
Yakima HangOut 2 Bike Rack - Trunk Mount - Adjustable Arms

Works great for my 2019 Jeep Renegade. I adjusted it to be open a little more, so I could use my rear wiper. It also keep pressure off the rear spoiler.
We purchased the Hang Out to expand our biking options while camping. Several years ago we purchased a Jack-It Aero carrier from e-Trailer to carry bikes on our TAG. It's a great option for transporting bikes T/F camp ground. But what do you do if the bike trails are a distance from where you’re camping? Enter the Hang Out. It takes up minimum space, mounts quickly to the Jeep and off we go. Bonus: We jettisoned a bulky, expensive hitch-mounted carrier and use the Hang Out for local bike excursions.
# 5
Thule Passage 3 Bike Carrier - Trunk Mount
2010 Chevrolet HHRThe side / bottom straps are seriously lacking. It has those straps you would find on a backpack, making it difficult to securely tighten down because of the angle. I'd usually have to pre-tighten them to a certain length, then forcefully shove the whole rack until it clipped onto my car. They really just need to be ratchet straps. Even then, one of the side straps came off while driving after hitting a small pothole and the whole thing dangled to one side - Luckily I was in a parking lot. I've also never been able to fit 3 regular bikes, only 2. It's really only a capacity of 3 if you have 2-3 slim bikes. The rubber is so wide that it makes it nearly impossible to slide certain bikes on. If you have a step thru bike with one of those crossbar adapters, I wouldn't even bother with trying this. Unfortunately I don't use this anymore since I'd be constantly worrying the whole thing will come off whenever I drive.
Ford EdgeFits perfectly on our Lexus CT200h. Only on the old LS400, the side straps have to be fastened to the wheel arch edge, since the upper trunklid gap is to narrow for inserting the strap hooks. Mounting of two bikes is (with some routine) quickly done, and they stay safe even for longer and faster routes. For transporting three (mountain) bikes, though, the design doesn't seem big and robust enough. Nevertheless, the price-benefit-fun ratios are way better than reasonable.
# 6
Kuat Beta Bike Rack for 2 Bikes - 1-1/4" Hitches - Tilting
This is a great bike rake. Company stands by its products also.
I was looking for a light weight bike rack for my 2015 Honda Accord. Your videos stated that the Kuat Beta was light and easy to install. You were right. I opened the box, read the instructions, and had it installed in about 10 minutes. I don't use a rack lock. It is so easy to pop on and off the hitch that I keep the rack in my car trunk.
# 7
Swagman Fork Down Roof Mounted Bike Carrier - Fork Mount
Goes together quickly, appears that it will fit my needs in terms of being cross-compatible on a variety of vehicles. Fit on a Subaru Outback factory crossbar and transported bike locally with no issues when I got it out to set up and test (not quite warm enough to ride much yet where I live). Instructions are not super, but the assembly is pretty straightforward so that is not a problem. At the price point, if this rack indeed holds up to swapping onto multiple vehicles and lasts me a few years, I'll be thrilled with the purchase.
I purchased two of these racks, along with another rack that is meant to hold bikes with both tires still installed. I am extremely happy with all three of them. This rack specifically is very sturdy. Installation was sort of a pain, but that was mostly due to me installing it on the top of my 2004 GMC Yukon XL...it is so high that it was a little hard to install. But now that it's installed, it's actually very simple to take the bikes on and off. I've made one round trip with these racks, so I've put the bikes up there and removed them twice. Both trips (about 100 miles each way) they bikes were super sturdy and I had no concerns about them falling off or anything like that. I would definitely recommend this rack if you're looking for a fork down roof mounted bike carrier. In fact, I will very likely get another one when we add another bike to the family. I think I'll be able to fit four racks on the top of my Yukon easily. One last note - I was initially concerned about the height of my vehicle when bikes were on top of them. I brushed a couple of tree limbs when pulling into my camping spot, but it was no big deal. I think the total height of my load was about 10 feet, which was lower than the camper that I was pulling.
# 8
Thule Hitching Post Pro Bike Rack for 4 Bikes - 1-1/4" and 2" Hitches
Super sturdy and easy to use/install. Love the bolt hitch attachment, keeps the rack from swaying/wobbling. Attachment points are very solid and the anti swing clips keep your bikes from smashing into each other and the rack during fast starts and stops. I use for all types of bikes, road, mountain, cruiser, children's, etc.
The good: I like the way the bikes are held in and the ability to add the upright adapters to the bike frame holders. The straps are quality too. For a jeep with a spare tire, this is the perfect length to clear it. This rack is 5 stars from the bike holders to the base of it. The bad: the 2"receiver adapter and bolt are insufficient. I wish they made this in a solid 2" hitch. The entire setup is held into the receiver by a very short bolt. It only goes about half way into the receiver tube. So your hitch is only "secured" on one side. A hitch pin or bolt should go through the receiver tube completely imo so it can be secured on the other end with a retaining clip or nut. Because this only goes in the one side, the entire weight of the rack plus bikes are held tight to one side of the receiver by the undersized bolt and washer. A few bumps down the road and that bolt loosens. Now instead of distibuting the weight of the rack and bikes on the receiver and post, it's completely up to the bolt to keep you from losing the rack. The bolt threads get damaged too. I took this down a dirt road and nearly lost everything. I had to buy my own bolt with hd fender washers and lock washers to correct this. Thule should've provided this from the start. The current short bolt design where only one side of the receiver secures the rack is unacceptable. This rack is 1 star at best for the connection to the receiver.
# 9
Yakima FrontLoader Wheel Mount Bike Carrier - Roof Mount
Overall I am happy with these bike carriers. They mount to the racks over the bed of my Tundra TRD Pro. Installation is simple. I think they could be just a bit sturdier because there is just a bit of wobbling when driving on bumpy roads but I'm not too worried about them coming dislodged. Take note that although they come with a cable lock to attach the bike to the carrier, the key is sold separately.
Very good product. It holds the bike securely on the roof without contacting the frame. It is easy to adjust from my road bike to my 29er mountain bike. Our drives are all relatively short, so I like that I do not need to remove the front wheel to lock in the bike. It's also nice that the SKS locking system allows me to use the same key for this rack that I use for my Yakima roof box and hitch rack. This is my first roof rack and I chose this route for a couple reasons. Some of the roads we travel to get to our trail heads are a bit rough and with a roof rack I don't have to worry about bottoming out a hitch rack hanging off the back of the vehicle. Also, it takes up less room in the garage. Our vehicle is a 2000 Jeep Grand Cherokee with an additional 4 inches of ground clearance. That makes it a bit of a reach for my 5'4" wife, so we take our two-step along to help her. This is my third time purchasing from etrailer, and each experience has been very good. They are a very customer service oriented company. I really appreciate all the additional information they provide on their products, especially all the videos they produce to aid in reviews, assembly, and use.
# 10
Malone Pilot Roof Mounted Bike Rack - Wheel Mount
These were perfect to mount on my motorcycle tailer. The raised front wheel allowed me to fit it over a cross brace on the motorcycle wheel chock.
The Malone Roof bike rack I bought at Etrailer is perfect. It is simple to mount on the roof and simple to mount a bike on it. At one point I use it to drive my bike all the way from Ottawa Canada to Richmond Virginia, some 1,100 KM. The bike is so solid attached with Malone, there is no single movement of it. I strongly recommend to other to buy it.
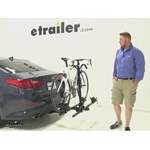
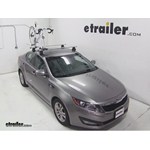
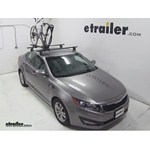
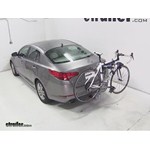
Kuat Hitch Bike Racks Review - 2018 Kia Optima

Hi everyone, it's Evie Angeline here at each trailer, and today we're looking at the Kuat Transfer V 2, two bike rack here on our Kia Optima. So the Kuat Transfer has a bunch of cool things going for it. One is that it has a unique goalpost design, which allows you to step into the bike rack to get your bikes. Also for the Kia Optima, usually your only option for a hitch is a class one hitch. So your selection of bike racks are limited. And this is one of the only bike racks that can tilt away with the bikes on because you wanna access your trunk.
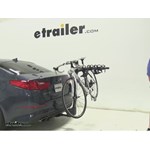
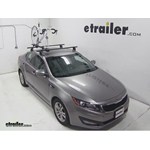
Hollywood Racks Hitch Bike Racks Review - 2018 Kia Optima

Hi, everyone. It's Evangeline here at etrailer and today, we're looking at the Hollywood Racks Destination 2 Bike Racks here on our 2018 Kia Optima. So the Hollywood Racks Destination Bike Rack is a great option for when you only have a class 1 hitch, like what our Kia has right now, because you can still get a platform rack, the stability of a platform rack, without it being too heavy. So let's take a look at the way our bike is mounted to this bike rack. We have two wheel straps for the front as well as the back wheel, and we also have this frame mount. So that frame mount is unique in its design because you can, you have a 360-degree rotation for this mount.
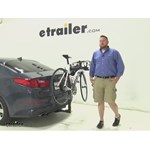
Reese Hitch Bike Racks Review - 2016 Kia Optima

Adam: Hi, everyone, Adam, with etrailer.com. Today, we're going to be taking a look at the Reese Three, hanging style bike rack, on our 2016 Kia Optima. So this is the three bike rack version that will be available for two and an inch and a quarter inch hitches. But we do have a four bike rack version that will be available only in a two-inch hitch. So if you have a two inch hitch and you have a couple extra buddies, you plan on riding with, you can go ahead and go with the four bike rack version as well.But this one's the three, and they're both going to have two tie-down points per bike. You're going to have two here up top, and they're going to be just a simple hook and loop strap, very simple to get this off, do it on both.
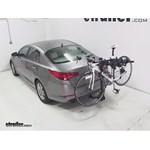
Thule Doubletrack Hitch Bike Racks Review - 2014 Kia Optima
Today on our 2014 Kia Optima we're going to be doing a test fit of the Thule Double Track platform-style 2-bike rack. As you can see here, we've already got it up on our vehicle installed, fitted, so you can see what it looks like and how it fits. We're going to go through how to break it down and how everything comes together. It's going to be part number TH990XT. First things first, we're going to get a few measurements starting with your closest distance first, which in this case is going to be from the bracket here to the back side of the bumper at about 3-1/4". Overall distance that we've added to the vehicle to the back of the cradle arms here at about 30-1/4", and ground clearance at about 15". Now we'll give you your ground clearance from this side as well, which looks like it's going to be about 8-3/4". Now let's take the bike down.
Thule Hitch Bike Racks Review - 2014 Kia Optima
Today on our 2014 Kia Optima we're going to be doing a test fit of the Thule Vertex 4. This is going to be your hanging-style 4-bike rack, part number TH9029XT. As you can see, we've already got it fitted up here on our vehicle so you can see how it looks and fits once it's installed. We're going to go through a few things first. The measurements will be the first thing, starting with our closest distance here. It's going to be about 3-1/2" from that front bracket to the back side of the bumper. Our overall distance that we've added to the vehicle is going to be about 35-1/2", for the rear ground clearance of about 9-1/2" to the bottom of the shank.
Saris Axis Hitch Bike Racks Review - 2014 Kia Optima
Today on our 2014 Kia Optima, we're going to be doing a test fit of the Saris Axis, this is going to be your hanging style 2 bike rack, part number SA832. As you can see we've already got it installed and up here with a bike on the back of our vehicle. This bike rack does come with an 1 1/4 shank for your class 1 and 2 hitches and a 2 inch adapter for your class 3 hitches as well. If you look over on the side here, you'll see that we have multiple straps. Let me go ahead and explain those straps. The once on the side on the down tube and seat post here is going to be your anti sway. This is going to help prevent the bike from swinging from front to back and the ones on top are going to be your frame straps to keep the bike from bouncing up and down.
Swagman Hitch Bike Racks Review - 2014 Kia Optima

Today on our 2014 Kia Optima, we are going to be doing a test fit of the Swagman Trail Head 4. This is going to be your hanging style 4 bike rack. It does come with an inch and a quarter shank for your class one and two hitches as well as a two inch adapter for your class three hitches. We do have it mounted up to our class one hitch today. We are going to give you a few measurements to start this off. This is just so you can see how it looks and fits once it's all completed. Our first measurement's going to be from the front, where this bend it in the shank, to the back end of the receiver.
Swagman Titan Hitch Bike Rack Review - 2013 Kia Optima
Today on our 2013 Kia Optima, we'll be test fitting the Swagman Titan 4 Bike Carrier for inch and a quarter and 2 inch hitches, part number S63410. Please keep in mind when using a class 1 or 2 hitch, you can carry a maximum of 2 bikes. To begin our test fit, we'll slide the shank of the carrier into the receiver tube of the hitch, line up the pin hole, and thread in our anti-rattle bolt, tightening it with a wrench. Now we'll go over some clearance measurements. We have about 12 inches of ground clearance. The closest point of the carrier to the rear of our Optima is about 7 1/2 inches.
RockyMounts TieRod Stretch Roof Bike Rack Review - 2013 Kia Optima
Today on our 2013 Kia Optima, we'll be test fitting the Rockymounts TieRod Stretch roof mounted bike rack, part number RKY1011. With a Thule Rapid Traverse roof rack system assembled onto our vehicle, we'll begin by placing the Stretch directly onto our load bars. Here at the front, we'll bring the rubber coated straps around our front load bar, remove the black plastic cover, and fit the straps back into the head of the carrier. We can then use an Allen key to tighten the Allen bolt which will tighten our straps around our front bar. With the straps tight, we can then replace our black plastic cover. We'll remove one of the Allen bolts to bring our clamp around our rear bar. We'll fit the Allen bolt through the clamp, and then tighten both Allen bolts down with an Allen key. With the front and rear secured, we can go ahead and undo our rear strap, and make sure our skewer at the front is loose. We'll grab our bike, place it onto our bike rack, and drop our front forks down onto our skewer. We'll secure the bike first by tightening our skewer, and then move to the rear, and tighten the wheel strap. With our bike all loaded up, we're ready to go. That completes today's test fit of the Rockymounts TieRod Stretch roof mounted bike rack, part number RKY1011, on our 2013 Kia Optima. .
Kuat Sherpa Hitch Bike Rack Review - 2013 Kia Optima
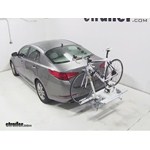
Today on our 2013 Kia Optima, well be testing the kuat Sherpa aluminum platform style, hitch mounted, two bike rack part number s102. To begin our test fit well slide the shank of the carrier into the receiver tube of the hitch. Line up the pins hole and install our pin and lock. Here at the rear of the shank, well tighten the hand knobs, secure our bike rack to the vehicle, and engage our anti-rattle device.Now well go over a few clearance measurements. We have about 12 inches of ground clearance. The closest point of the carrier to the rear of our vehicle is about 2 inches, and weve added about 13 inches to the overall length of our Kia Optima.
Yakima FrontLoader Roof Bike Rack Review - 2013 Kia Optima
Today on our 2013 Kia Optima, we'll be test fitting the Yakima Frontloader wheel mounted bike rack, part number Y02103. With the Yakima round bar roof rack system assembled onto our vehicle, we'll begin our test fit by placing the Frontloader directly onto our crossbars. Here at the front, we'll make sure that our clamps are around our front bar. Then we can use the hand knob on the front end to tighten our clamps around our front crossbar. Here at the rear, we'll bring our rear clamp around our rear bar, drop the t-bolt through the appropriate slot, and then tighten it down with the t-handle on top. With the front and rear secured, we can undo our rear wheel strap, and open up our wheel cradle at the front. We'll grab our bike, place it onto our bike rack. We'll secure it first here at the front wheel. At the rear wheel, we can simply tighten with the wheel strap. With our bike all loaded up, we're ready to go. That completes today's test fit for the Yakima Frontloader wheel mounted bike rack, part number Y02103, on our 2013 Kia Optima. .
Yakima ForkLift Roof Mounted Bike Rack Review - 2013 Kia Optima
Today on our 2013 Kia Optima, we'll be test fitting the Yakima Forklift roof mounted bike rack, part number Y02098. With the Yakima round bar roof rack system assembled onto our vehicle, we'll begin by placing our Forklift directly onto our crossbars. Here at the front, we'll bring our front clamp around our front bar, drop the t-bolt through the appropriate slots, and tighten using the t-handle. Then we can remove our skewer. We'll slide the slotted bracket up around our t-handle, and re-install our skewer. Here at the rear, we'll bring our rear bracket around our rear bar, drop the t-bolt through the appropriate slot, and then use the t-handle to secure it around our rear bar. We'll go ahead and undo the rear wheel strap, and make sure our skewer at the front is loose. We'll grab our bike, place it onto our bike rack, and drop our front forks down onto our skewer. We'll secure the bike first by tightening our skewer, and then move to the rear, and tighten with the wheel strap. Just like that, our bike's all loaded up, and we're ready to go. That completes today's test fit for the Yakima Forklift roof mounted bike rack, part number Y02098, on our 2013 Kia Optima. .
Thule Helium Aero Hitch Bike Rack Review - 2013 Kia Optima
Today on our 2013 Kia Optima, we'll be test fitting the Tule helium aero two-bike rack for inch-and-a-quarter and two-inch hitches, part number th9042. To begin our test fit, we'll slide the shank of the carrier into the receiver tube of the hitch. Line up the pin hole, and install the attached pin. Here at the rear of the shank, we'll tighten the hand knob to secure our bike rack to our vehicle, and engage our anti-rattle device. Now let's go over a few clearance measurements. We have about 12-1/2 inches of ground clearance.
Thule Big Mouth Roof Bike Rack Review - 2013 Kia Optima
Speaker: Today on our 2013 Kia Optima we'll be test fitting the Thule Big Mouth Roof Mountain Bike Rack Part No. TH-599XTR. With the Thule Traverse Roof Rack System assembled on our vehicle we'll begin our test fit by placing the Big Mouth directly on to our load bars. Here at the front we'll bring our clamps around our front bar, fit the two slots through the clamp and use the wing nut on top to tighten it down. We'll do this for both clamps at the front of our carrier. Here at the rear we'll undo one of the wing nuts to bring our clamp around our rear bar. We'll feed the brackets through the bolts and then make sure both wing nuts are tight around our bar. Then we can undo our wheel strap and make sure our frame jaw is open.
Swagman Upright Roof Mounted Bike Rack Review - 2013 Kia Optima
Today on our 2013 Kia Optima we will be test fitting the Swagman Rooftop bike rack, part number S64720. With a Thule rapid traverse roof rack system assembled onto our vehicle, we begin our test fit by placing our bike rack directly onto our load bars. Here at the front platform, we'll take a U-bolt and feed it around the underside of our load bar, well bring the U-bolts back up through the platform and secure it in place with two wing nuts. We can then repeat that process for the other side of the front platform. Here at the rear we'll drop the U-bolt through the top of our bike rack, making sure that U-bolt go around our rear load bar then we can fit our bracket through the bolts and tighten in place with the wing nuts. With the front and rear secured, we can go ahead and open up our frame jaws and undo each wheel strap. We'll grab our bike and place it onto our bike rack and we'll secure it first by bringing the frame jaws up around the lower part of the frame and using the hand knob to secure it. We'll then move to each wheeland tighten with the wheel strap.With our bike all loaded up we are ready to go. That completes today's test fit of the Swagman Rooftop bike rack, part number S64720 on our 2013 Kia Optima. .
Swagman Fork Down Roof Bike Rack Review - 2013 Kia Optima

Speaker: Today on out 2013 Kia Optima we'll be test fitting the Swagman Fork Down Roof Mountain Bike Rack Part No. S-64710. With the Thule Rapid Traverse Roof Rack System assembled on our vehicle we'll begin our test fit by placing the fork down directly on to our load bars. Here at the front platform we'll bring our U-bolts around the underside of our load bars picking them up through the platform and securing them in place with the wing nuts. We'll do this for both U-bolts at the front platform. Here at the rear we'll take our U-bolt and drop it through the top of our bike rack. We'll fit the bolts through our bracket and secure it with a wing nut. With the front and rear secured we can go ahead and undo our rear wheel strap and loosen up our skewer at the front.
RockyMounts TieRod Roof Bike Rack Review - 2013 Kia Optima
Today on our 2013 Kia Optima, we'll be test fitting the RockyMounts Tierod Roof Mounted Bike Rack, part number RKY1014. With the Thule rapid reverse roof rack system assembled onto our vehicle, we'll begin our test fit by placing the tierod directly onto our load bars. Here at the front we remove the black plastic cover, we'll bring a rubber coated straps around our front bar and secure our straps in the head of our carrier. We can then use an Allen key to tighten the Allen bolt which will tighten our straps around our front bar. Once that's done we can then replace our black plastic cover. Here at the rear, we'll undo the Allen bolts to bring our rear clamp around our rear bar. We'll place the Allen bolt through the holes in the clamp and tighten our rear clamp around our rear bar with our Allen key.
Prorack 4 Hitch Bike Rack Review - 2013 Kia Optima
Today on our 2013 Kia Optima we'll be test fitting the Pro Rack Four Bike Rack, part number PR8062404. Please keep in mind that when using a class one hitch, you can carry a maximum of two bicycles. To begin our test fit, we'll slide the shank of the carrier into the receiver tube of the hitch. Line up the pin hole, thread in our anti-rattle bolt and tighten it with a wrench. Now we'll go over some clearance measurements. We have about nine inches of ground clearance.
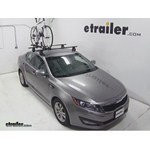
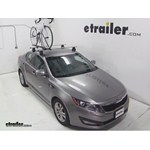
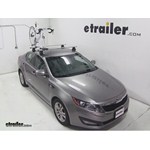
Kuat Alpha Hitch Bike Rack Review - 2013 Kia Optima
Today, on our 2013 Kia Optima, we'll be test fitting the Kuat Alpha Aluminum Folding Locking 3-Bike Rack for 1 1/4 inch hitches, partner number A103-white-114. Please keep in mind that when using a class 1 hitch, you can carry a maximum of 2 bikes with this rack. To begin our test fit, we'll slide the shank of the carrier into the receiver tube of the hitch, line up the pinhole and install our pin and lock. Here at the rear of the shank, we'll use the hand knob to secure our bike rack to our vehicle and engage our anti-rattle device. We'll go over a few clearance measurements. We have about 11 inches of ground clearance. The closest point of the carrier to the rear of the Optima is about 5 inches. We've added about 12 inches to the overall length of our vehicle. We can access the trunk without having to tilt away our bike rack.


What our customers are saying:
"We just recently used the hitch bike rack, it was easy to put on and worked great.It makes traveling easy! Thanks for the quick shipping service too.Ill recommend your product to everyone. Thanks Rick"